
A man’s shoes are the cornerstone to his outfit.
And people read them fast. In a University of Kansas study, strangers shown nothing but a photo of someone’s shoes made accurate calls on that person’s age, income, and even how anxious they were in relationships. One photo. No face, no outfit — just the shoes.
What you may not have heard before is that a quality pair of leather shoes can fail to make a good impression if your shoelaces are tied wrong. Knowing how to lace dress shoes properly is the cheapest upgrade you can make to a pair you already own.
Learning how to tie shoelaces is an important rite of passage for every child. We learn a standard sequence of looping and securing our laces in kindergarten.
And we continue with the same ritual into our adulthood!
No one is going to fault a child for how they tie their laces, as long as the shoe stays on.
As an adult, we need to revisit this childhood routine to check if this daily ritual can be improved to reflect grown-up values.
Why is it important to relearn this simple daily ritual and do it the right way?
- Your shoelace knot won’t look sloppy or bulky.
- Instead, it mimics the shape of a bow-tie.
- The laces won’t come undone.
- The shoe fits more snug, providing comfort and preventing injury.
You may have just purchased a quality pair of dress shoes and are looking for more information on how to properly lace them.
Continue reading for options on lacing style, shoelace length and knots.

Click Here To Watch The Video – One Mistake That Ruins Dress Shoe Look?
Shoe Lacing Basics: Eyelets, Aglets & Even Pressure
Nobody knows who invented shoelaces. They have existed for thousands of years, probably starting off as basic strips of tree bark used to secure leather thongs.
The plastic (sometimes metal) ends of a lace are called aglets. They make it easier to pass the laces through the eyelets and prevent the ends of the laces from fraying.
Traditionally, dress shoes are made with either 5 or 6 pairs of eyelets. However, this number can range between 2-8 pairs of eyelets. The laces are fed into the eyelets bottom-up, working their way up from the toe cap to the top of the shoe. When secured, the laces should draw the tongues of the shoe together, closing the gap that allows your foot to fit into the shoe.
Done correctly, the laces provide an even, balanced pressure that secures the shoe to your foot and provides comfort and support while walking.
The Wrong & Right Way To Tie Your Shoes
If your shoelaces are always coming undone, or you have a crooked shoelace bow, you probably used an unbalanced granny knot.
The granny knot is the standard and most well-known technique for tying shoe laces.
If you are tying your shoelaces with a granny knot, the laces tend to sit vertically (from heel to toe), instead of across the top part of your shoe like a bow-tie. There is also a higher likelihood that your laces will come undone.
Wrong way to tie shoes looks like this:

Right way to tie shoes looks like this:

The most common technique to tie shoe laces is a two-step process.
- By layering two half-knots on top of each other and wrapping the left piece of the lace over and around the right one and pulling it through.
- The laces are secured by passing the left piece through the gap just formed under the knots and pulling both loops in opposite directions to lock the knot.
This produces the unstable and aesthetically incorrect granny knot.
By reversing the orientation of the first half-knot (pass the left piece of the lace under the right one before pulling it through) results in a much stronger knot.
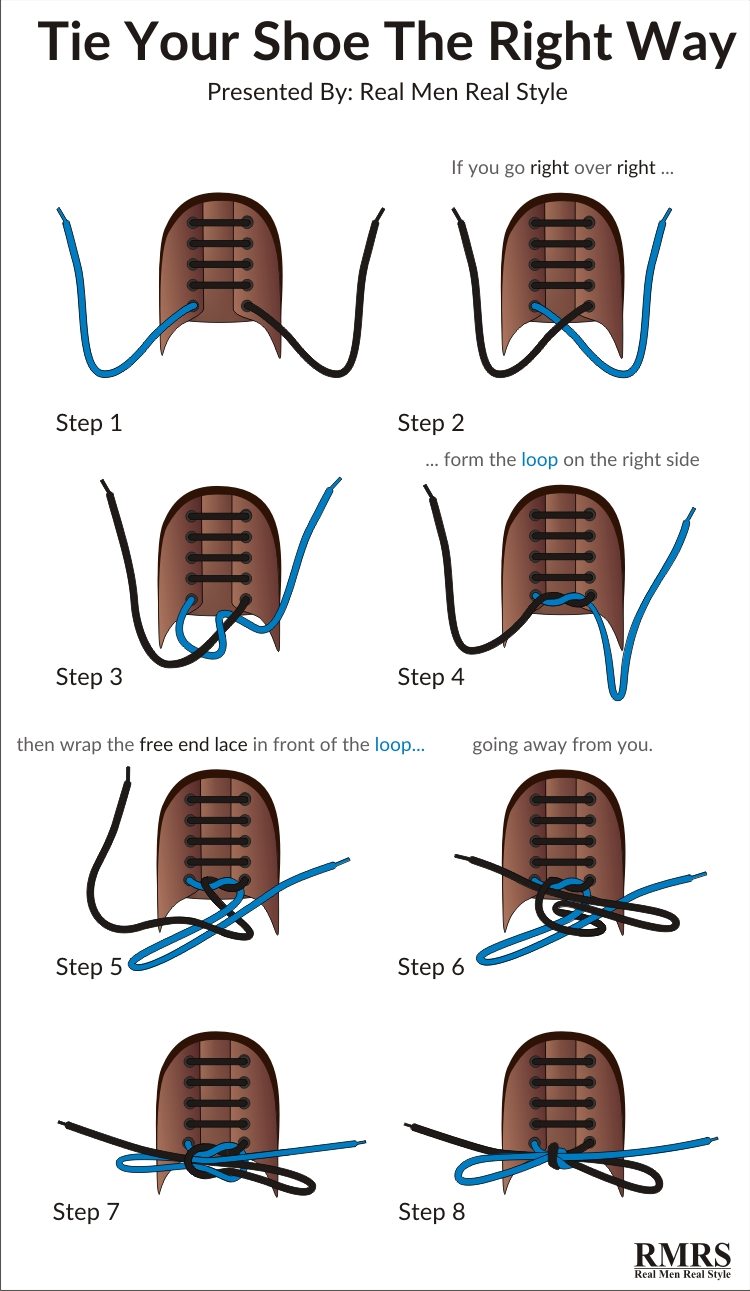
The correct technique results in a balanced knot that sits straight and stays secure.
- The starting knot – Left end over right end or right end over left end.
- The bow, or finished knot – Check the 6 steps listed below.
For the starting knot, if you start with left end over right end – create a loop with the right hand and with the left hand, make an anti-clockwise loop around the first loop, thread it through and fasten.
If you start with the right end over left end – create a loop with the left hand, make an anti-clockwise loop around the first loop, thread it through and fasten.
Also known as the bowknot, this method of tying laces mimics a bowtie knot and sits horizontally across the top of your shoes. A more appealing presentation than the regular granny knot.
- Step 1 – Start with a left over right, simple knot. Make the right end into a loop by simply doubling it back onto itself.
- Step 2 – Take the left end and pass it around to the right, going clockwise behind the right loop.
- Step 3 – Continue the left end around the right loop to end up in front.
- Step 4 – Feed the left lace into the gap that has just been created.
- Step 5 – With the left lace now through the gap, hold both loops and pull the knot tight.
- Step 6 – Continue pulling on the loops until the knot is firmly secured.
Oxford Or Derby? The Shoe Decides The Lacing

Before you lace anything, look at how the eyelet tabs are attached to the shoe. That one detail decides which lacing method belongs on it.
On an Oxford, the eyelet tabs are stitched underneath the vamp — the front panel of the shoe. That’s closed lacing. Pull the laces tight and the two tabs meet in the middle and sit flush, like a seam. Straight lacing is built for exactly this. The parallel bars run clean across a surface that closes completely, and it’s the neatest thing you can do to the top of a shoe.
On a Derby, the tabs are stitched on top of the vamp. Open lacing. Those tabs sit above the shoe and are meant to spread apart — that’s the design, and it’s why a Derby fits a high instep or a wide foot better than an Oxford ever will.
So straight lace your Oxfords. Every time. You can straight lace a Derby too, and plenty of well-dressed men do, but the tabs won’t close flush and you’ll see a gap between the bars. Criss-cross is the honest choice there, and on anything casual — brogues, boots, anything with a rubber sole.
Here’s the shorthand. Closed lacing, formal shoe, straight lace it. Open lacing, casual shoe, criss-cross is fine.
Straight Lacing: How To Lace Oxfords Step By Step
On a shoe with 6 pairs of eyelets, there are close to 2 trillion ways to thread a lace through — 1,961,990,553,600, if you want the exact number. Mathematician Burkard Polster ran the problem in Nature and found that 43,200 of those are actual usable lacing methods. You need exactly one of them.
Here are just a few of the most popular styles – International lacing, bar (ballroom) lacing, military style (for boots), basic criss-cross lacing and straight lacing technique.
Straight lacing is the correct method for shoes with closed lacing. Criss-cross belongs on open-laced and casual shoes.
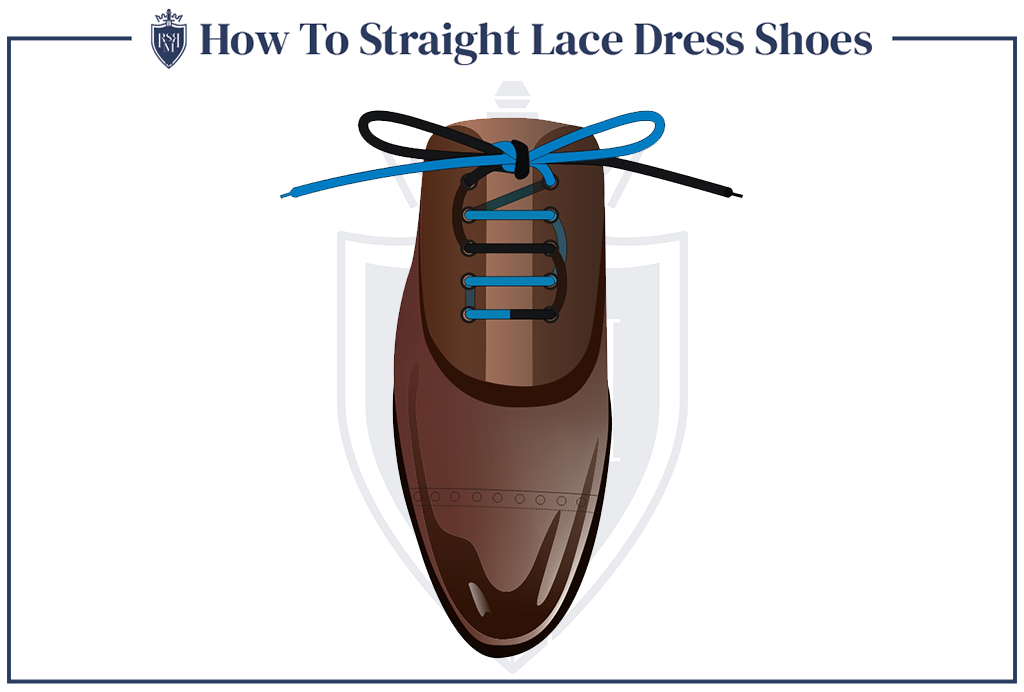
Dress shoes such as Oxfords are best secured with straight lacing because it allows the uppers of the shoe to come completely together in the middle. The laces run parallel and straight across on the outside and diagonally on the inside. The underlying zig-zag mess will be completely hidden – presenting a clean and uncluttered view from the top.
Follow this sequence of straight-lacing for your dress shoes to avoid uneven pressure on one side of the foot from improper lacing techniques.
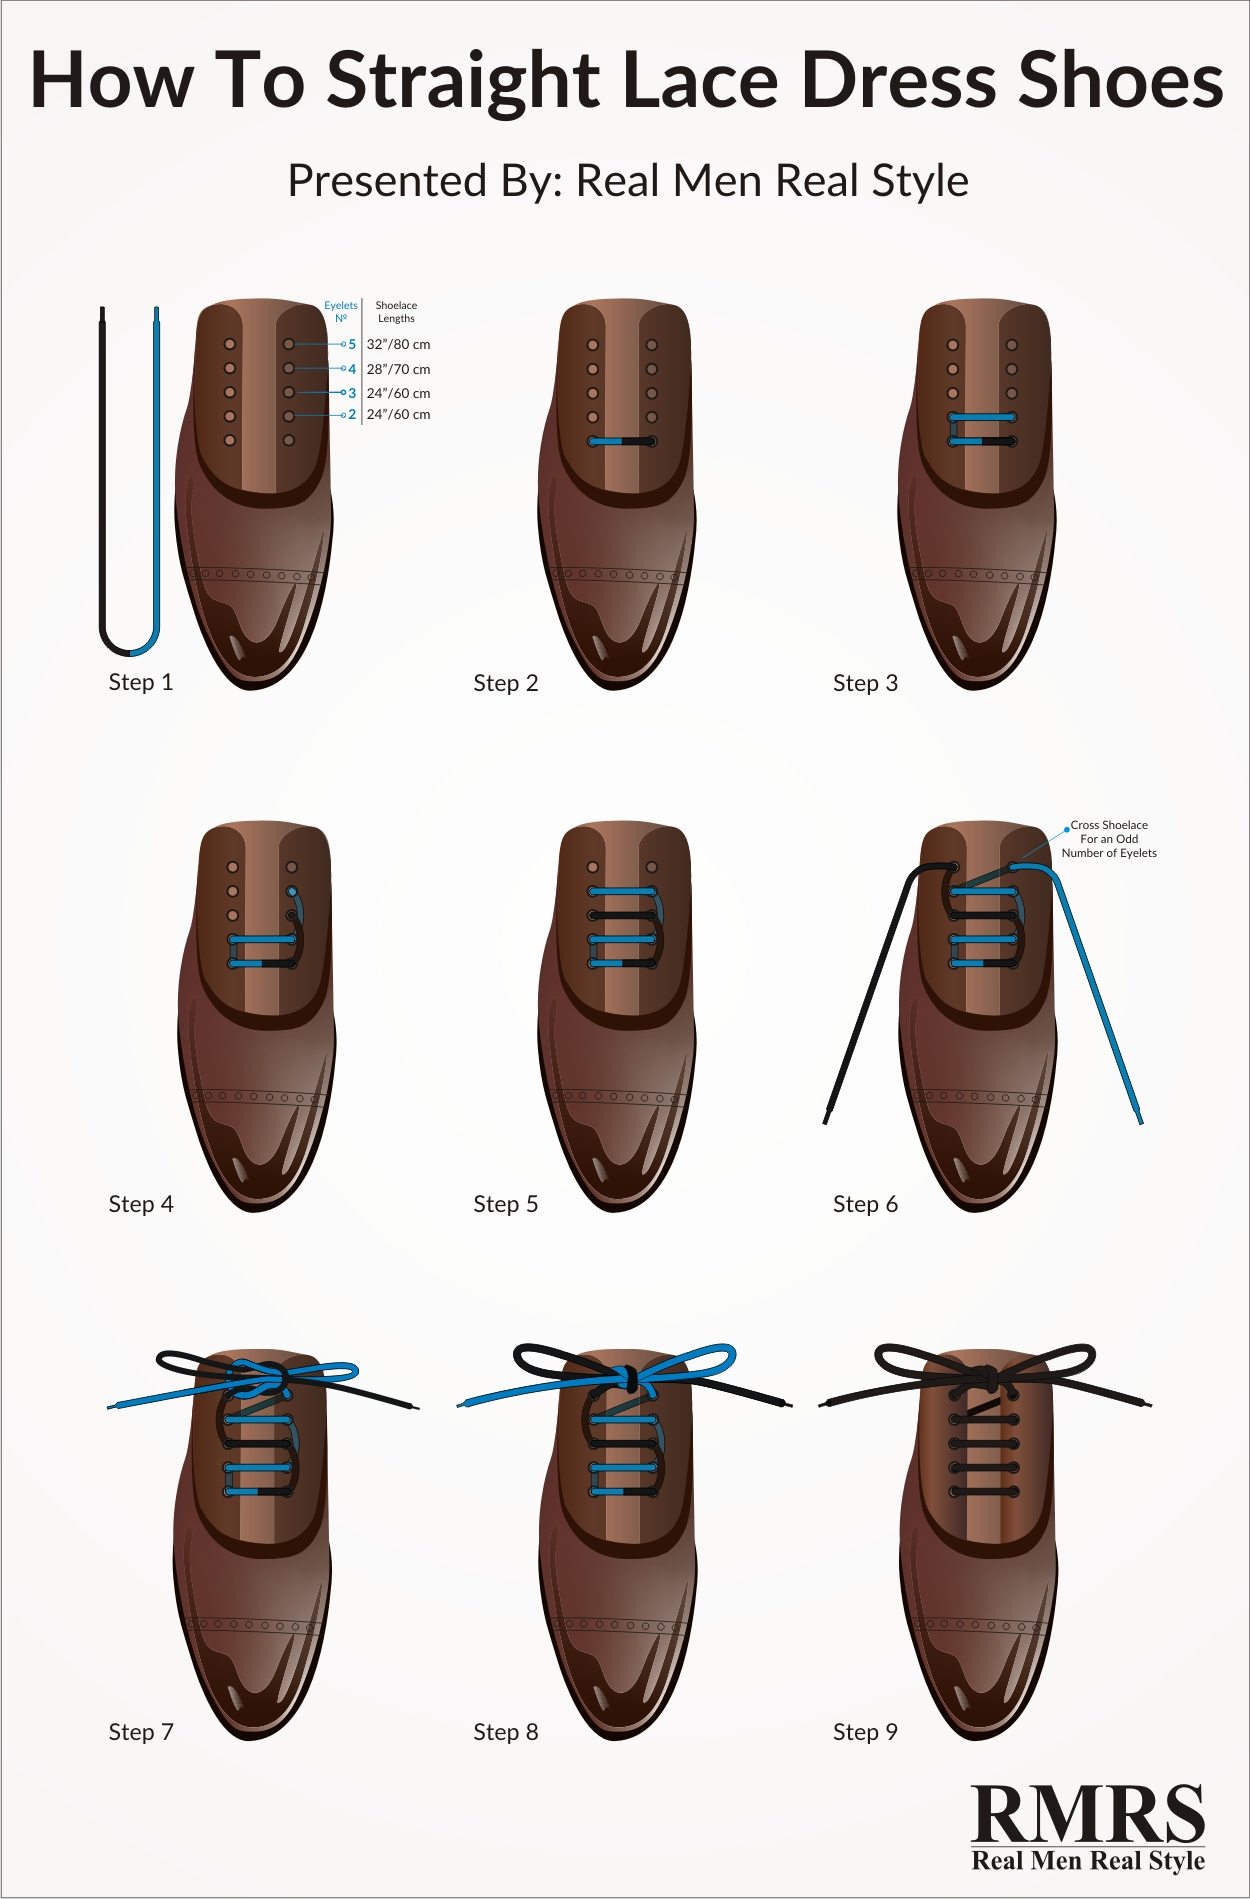
- Begin straight across on the outside and in through both the bottom eyelets. On shoes with odd numbers of eyelet pairs, adjust so that the left end is slightly longer than the right end.
- Cross the left lace diagonally on the inside and then straight across on the outside.
- Cross the right lace diagonally on the inside and then straight across on the outside.
- Alternate both the right and left laces in this progression until you reach the top.
How Long Should Your Dress Shoe Laces Be?

Here’s the thing nobody tells you when you go to buy replacement laces: length matters more than color.
Too short and you’re fighting to get a bow tied, with stubby little loops that pull the shoe crooked. Too long and you’ve got laces flapping over the welt and dragging on the sidewalk — which is how you end up with a frayed aglet inside six months.
The number of eyelet pairs on your shoe decides the length, so count them before you order. For most dress shoes — a five- or six-eyelet Oxford — you want 30 to 32 inches (75 to 80 cm). A three- or four-eyelet shoe takes less, around 27 inches (70 cm). Dress boots are a different animal: five to seven eyelets usually calls for 45 to 47 inches (115 to 120 cm), because the gap between the eyelet rows is wider and there’s more shoe to climb.
One more thing worth knowing. Straight lacing eats slightly less lace than criss-cross, because the diagonal runs are hidden underneath instead of crossing the full width on top. If you’re stuck between two sizes and you straight lace, take the shorter one.
Already own the shoes? Lace them up, tie your normal bow, and look at the loops. If the ends of the bow reach past the edge of the shoe on either side, your laces are too long. If you can barely get a bow tied at all, they’re too short.
#rmrs-cmp-laces *{box-sizing:border-box;margin:0;padding:0;}
#rmrs-cmp-laces{
–navy:#14213d; –navy2:#1f335c; –cream:#faf6ec; –cream2:#f1e9d6;
–gold:#c9a24b; –ink:#2a2a2a; –line:#e2d7bd;
font-family:-apple-system,BlinkMacSystemFont,”Segoe UI”,Roboto,Helvetica,Arial,sans-serif;
color:var(–ink); max-width:760px; margin:32px auto; padding:0 4px; line-height:1.5;
-webkit-font-smoothing:antialiased;
}
#rmrs-cmp-laces .cmp-title{
text-align:center; color:var(–navy); font-size:22px; font-weight:800;
letter-spacing:.2px; margin-bottom:4px;
}
#rmrs-cmp-laces .cmp-sub{
text-align:center; color:#6b6250; font-size:13px; margin-bottom:18px; font-style:italic;
}
#rmrs-cmp-laces .cmp-scroll{overflow-x:auto; -webkit-overflow-scrolling:touch;
border-radius:12px; box-shadow:0 6px 22px rgba(20,33,61,.12);}
#rmrs-cmp-laces table{
width:100%; border-collapse:collapse; background:var(–cream);
min-width:560px; font-size:15px; overflow:hidden; border-radius:12px;
}
#rmrs-cmp-laces thead th{
background:var(–navy); color:#fff; padding:16px 14px; text-align:left;
font-size:15px; font-weight:700; vertical-align:middle; border:none;
}
#rmrs-cmp-laces thead th.cmp-attr{background:var(–navy2); width:28%; font-size:13px;
text-transform:uppercase; letter-spacing:.6px; color:var(–gold);}
#rmrs-cmp-laces thead th .cmp-house{display:block; font-size:12px; font-weight:600;
color:var(–gold); text-transform:uppercase; letter-spacing:.6px; margin-top:2px;}
#rmrs-cmp-laces tbody th{
background:var(–cream2); color:var(–navy); font-weight:700; text-align:left;
padding:12px 14px; font-size:13px; text-transform:uppercase; letter-spacing:.4px;
border-top:1px solid var(–line); width:28%; vertical-align:top;
}
#rmrs-cmp-laces tbody td{
padding:12px 14px; border-top:1px solid var(–line); vertical-align:top;
color:var(–ink);
}
#rmrs-cmp-laces tbody td:first-of-type{border-left:1px solid var(–line);}
#rmrs-cmp-laces tbody tr:nth-child(even) td{background:rgba(201,162,75,.06);}
#rmrs-cmp-laces .cmp-badge{
display:inline-block; margin-top:6px; font-size:11px; font-weight:800;
text-transform:uppercase; letter-spacing:.5px; padding:3px 9px; border-radius:999px;
background:var(–gold); color:#3a2c07;
}
#rmrs-cmp-laces .cmp-bottom th{background:var(–navy); color:var(–gold);}
#rmrs-cmp-laces .cmp-bottom td{background:var(–navy); color:#f4efe2; font-size:14px;}
#rmrs-cmp-laces .cmp-note{
font-size:12px; color:#8a8071; text-align:center; margin-top:12px; line-height:1.5;
}
@media(max-width:520px){
#rmrs-cmp-laces .cmp-title{font-size:19px;}
#rmrs-cmp-laces table{font-size:13.5px;}
#rmrs-cmp-laces thead th{padding:12px 10px; font-size:13.5px;}
#rmrs-cmp-laces tbody th,#rmrs-cmp-laces tbody td{padding:10px;}
}
| Your shoe | Lace lengthStraight or criss-cross | Lace to buyMaterial & width |
|---|---|---|
| 3–4 eyelet pairs Low-cut Oxford or Derby |
27 in / 70 cm | Thin waxed cotton, round or flat, 2–3 mm |
| 5 eyelet pairs Standard Oxford |
30–32 in / 75–80 cm | Thin waxed cotton, round, 2–3 mm Most common |
| 6 eyelet pairs Oxford, Derby, longwing |
32 in / 80 cm | Thin waxed cotton, round, 2–3 mm |
| 5–7 eyelet pairs Dress boot or chukka |
45–47 in / 115–120 cm | Waxed cotton, round, 3 mm |
| Sneakers & sports shoes | Follow the pair that came in the box | Flat nylon — thicker, and it belongs there |
| Bottom line | Between two lengths and straight lacing? Take the shorter one — straight lacing uses less lace than criss-cross. | Thin, waxed, and dyed a real color. The dull cotton lace that came with the shoes is the first thing to replace. |
Lengths are for typical dress-shoe eyelet spacing. Wider shoes and boots with a bigger gap between the eyelet rows need the longer end of each range.
Use The Right Materials For Shoelaces
A pair of thin, waxed cotton laces are preferable for dress shoes. Laces from the drugstore are acceptable for an emergency, but richly dyed laces will keep your shoes looking sharp. The wax prevents the laces from becoming too slippery.
Thicker, nylon laces are best used on sneakers and sports shoes.
Round or flat? Round is the more formal of the two, and the thinner the better — a 2 to 3mm waxed round lace on a black cap-toe Oxford is about as dressy as a lace gets. Flat laces read a half-step more casual and disappear better when you see the shoe from the side, which some men prefer on brown shoes and brogues. Either one works on a dress shoe. What doesn’t work is the thick, dull, unwaxed cotton lace that comes in the box with most cheap shoes — that’s the first thing I replace on a new pair, and a decent set costs a few dollars.
Replace your shoelaces when they begin to fray or if the aglet is broken. Keep an extra pair of laces handy.
Dress Shoe Lacing: Common Questions
How long should dress shoe laces be?
For a five- or six-eyelet Oxford, 30 to 32 inches (75 to 80 cm). A three- or four-eyelet shoe takes about 27 inches (70 cm), and a dress boot needs 45 to 47 inches. Count your eyelet pairs before you order. If you’re between two sizes and you straight lace, take the shorter one.
Should you straight lace Derby shoes?
You can, and it looks sharp. But a Derby’s eyelet tabs sit on top of the vamp and are designed to spread apart, so they won’t close flush the way an Oxford’s do — you’ll see a gap between the bars. Criss-cross is the more honest match for a Derby.
Why do my shoelaces keep coming undone?
You’re tying a granny knot. Both halves of the knot twist the same direction, so it sits crooked and works itself loose with every step. Reverse your starting knot — if you go left over right, switch to right over left. The bow will sit straight across the shoe and hold.
Are round or flat laces more formal?
Round, and thin. A 2 to 3mm waxed round lace is the dressiest option you can put on a shoe. Flat laces sit a half-step more casual and work well on brown shoes and brogues.
The post How To Lace Dress Shoes: Straight Lacing, Step By Step appeared first on Real Men Real Style.